Market Gardening
Season Extension: Building a Caterpillar Tunnel That Pays Back in One Year
A working market gardener's guide to specifying, building and cropping a caterpillar tunnel — with real numbers on materials, labor, winter greens revenue and year-one payback.

Published July 15, 2026 · 13 min read
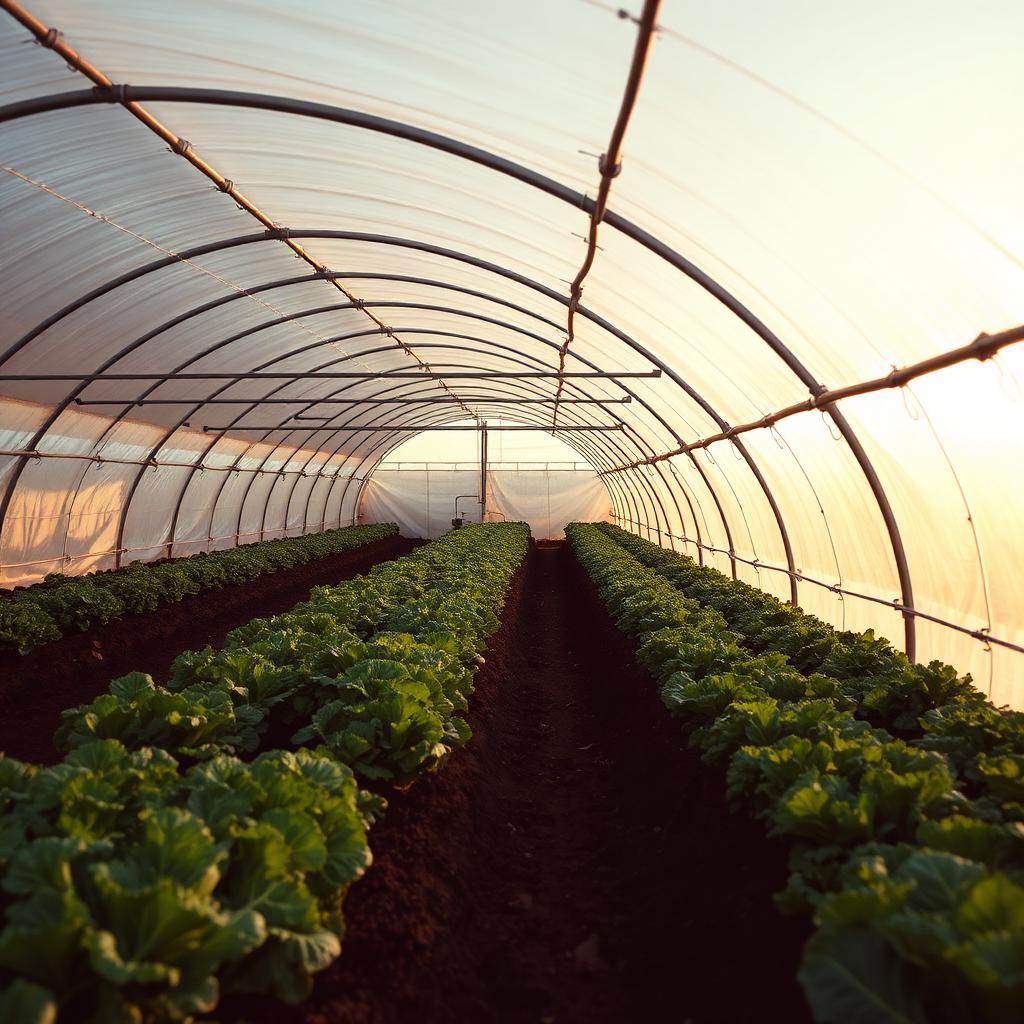
A caterpillar tunnel is the highest-return capital investment most market gardens have never made. It costs roughly one-fifth of a high tunnel, requires no permit in most jurisdictions, and — cropped correctly — will pay for itself in a single winter of salad greens. This guide walks through the specification, the build and the crop plan that produced first-year payback on our own market garden.
What a caterpillar tunnel is (and isn't)
A caterpillar tunnel is a low, gothic-arch tunnel built from 20-ft galvanized steel bows spaced roughly 5 feet apart, covered with a single sheet of 6-mil greenhouse plastic held down by rope in a caterpillar pattern (hence the name). It is typically 10–14 feet wide and 50–100 feet long, with 6–7 feet of headroom at the peak. It has no end walls, no permanent doors and no baseboards — the plastic simply gathers at each end and ties to a ground anchor.
It is not a high tunnel and it is not permanent. High tunnels have straight sidewalls, roll-up sides, engineered end walls and permanent post foundations — a serious structure and often a permitted building. Caterpillar tunnels are movable, unheated and considered temporary in most jurisdictions. That distinction is the entire economic case.
When season extension pays
Season extension only pays if you have a market that pays a premium for out-of-season produce. Salad greens, spinach, arugula, bok choy, radishes and green onions in December, January and February command 2–4× their summer wholesale price at farmers' markets, restaurants and CSA shoulder-season offerings. A caterpillar tunnel captures that premium for a fraction of the capital cost of a heated greenhouse.
It does not pay if:
- Your customer base doesn't shop through the winter.
- You cannot commit to twice-weekly harvests in cold weather.
- Your site has drifting snow loads above 15 lb/sq ft (the structure will collapse).
Specifying the tunnel
A 14 ft × 96 ft tunnel is our sweet spot for a two-person operation. That gives you four 30" beds with 24" pathways, 1,344 sq ft of protected growing space, and a footprint that fits inside a standard 100 ft market garden block. Smaller than 50 ft and the per-foot cost creeps up; longer than 100 ft and ventilation gets hard.
Bow spec: 1.66" (schedule 40) galvanized steel, 20-ft bows pre-bent to a gothic arch. Spacing: 5 ft on center. Purlin: a single 1.66" horizontal steel pipe running the length of the tunnel at the peak. Plastic: 6-mil 4-year UV-treated greenhouse film (Klerks K50 or equivalent). Ground anchors: 30" earth screws every 5 ft along each sidewall.
Materials list and real costs
Realistic materials cost for a 14×96 tunnel in 2026:
- 20 gothic bows (1.66", 20-ft), pre-bent: $1,700
- Peak purlin (100 ft of 1.66" pipe with couplers): $220
- Ground anchors (40 × 30" earth screws): $360
- Purlin cross-clamps and hardware: $180
- 6-mil greenhouse film (24 ft × 100 ft): $450
- Rope (500 ft of 1/4" polypropylene) and attachment hardware: $120
- Miscellaneous (baseboards, tie-downs, spare parts): $170
Total materials: approximately $3,200. A comparable 14×96 permitted high tunnel would run $12,000–$18,000 before site work and engineering.
The build, step by step
- Site the tunnel on well-drained ground, oriented with the long axis running east–west in northern climates for maximum winter sun exposure.
- Mark bow positions along both future sidewalls, 5 ft apart. Drive earth screws at each mark to a depth of 24 inches.
- Set the bows one at a time, sliding each end into its earth screw and pinning with a self-tapping screw. Two people can set all 20 bows in about 90 minutes.
- Install the peak purlin using standard cross-clamps. The purlin is what stops the tunnel from oscillating in wind — do not skip it.
- Prepare the growing beds before you cover. Trying to shape beds after the plastic is on is miserable.
- Cover with plastic on a still, warm day. Stretch tight, gather each end, and tie to a ground anchor with a rolling hitch.
- Rope the tunnel in a caterpillar pattern — over the top of the plastic, alternating sides, tied to the earth screws. This is what holds the plastic down in wind.
Total build time for two people with basic tools: 12–16 hours across two days.
A crop plan that actually pays back
The tunnel is unheated, so you are farming light and cold-tolerance, not heat. The productive winter crops in USDA zones 6–8 are: spinach, salad mix (asian greens, lettuce mix, mustards), arugula, tatsoi, mache, claytonia, scallions, radishes and overwintering carrots. Anything more tender (basil, tomatoes, peppers) is a spring/fall shoulder crop, not a winter crop.
Our year-one winter plan for 1,344 sq ft:
- Sept 1–15: Direct-seed spinach, mache, claytonia, overwintering scallions across two beds.
- Oct 1–15: Transplant salad mix, arugula, tatsoi, head lettuce into remaining two beds.
- Nov 15–Mar 15: Cut-and-come-again harvests every 10–14 days.
- Mar 15–Apr 15: Terminate winter crops, transplant early tomatoes and peppers for a June market advantage.
Labor, ventilation and winter management
The single most important management task is ventilation. Even in January, a sunny 30 °F day will push the tunnel interior to 70 °F+, which cooks tender greens and invites disease. Roll the plastic up on both sidewalls any day the forecast high is above 40 °F, and close it at 4 pm. Missing three ventilation days in a row will typically cost you a full salad-mix succession to Botrytis.
Watering is minimal in winter — one deep drip cycle every 10–14 days is usually enough. Snow load management is the other critical task: any accumulation above 3 inches needs to be brushed off with a soft broom from inside before it hits 8 inches, which is roughly the structural limit.
Year-one ROI on real numbers
Conservative revenue estimate for the winter crop plan above, at real market prices in a mid-sized farmers' market region:
- Spinach: 240 lb across the season × $12/lb = $2,880
- Salad mix: 180 lb × $14/lb = $2,520
- Arugula, tatsoi, mustards: 120 lb × $13/lb = $1,560
- Scallions, radishes, misc: $600
Gross winter revenue: approximately $7,560. Subtract $600 in seed, drip irrigation and fabric row cover. Net winter revenue: roughly $6,900. With $3,200 in materials, the caterpillar tunnel pays back in a single winter — and continues producing at that rate every year the plastic lasts (typically four winters before replacement).
Add in the shoulder-season crops (early tomatoes to market in June, fall peppers into November) and the same structure produces $9,000–$12,000 gross annually on 1,344 sq ft — the highest-earning acre on most market gardens.
Key takeaways
- ◆A 14×96 caterpillar tunnel costs about $3,200 in materials and pays back in a single winter of salad greens.
- ◆The economics only work if you have a customer base that pays a winter premium.
- ◆Ventilation, not cold, kills more winter crops than anything else — vent above 40 °F.
- ◆One tunnel earns $9,000–$12,000/year on 1,344 sq ft when you crop winter greens plus early spring and late fall shoulder crops.
- ◆Build a caterpillar tunnel before your first high tunnel — same winter revenue, one-fifth the capital.
Frequently asked questions
Do I need a permit for a caterpillar tunnel?+
In most U.S. jurisdictions, no — because it has no permanent foundation, no engineered end walls, and is considered a temporary structure. Always confirm with your local zoning office. NRCS classifies caterpillar tunnels separately from high tunnels for cost-share purposes.
How long does the plastic last?+
A quality 6-mil UV-treated greenhouse film lasts 3–5 years on a caterpillar tunnel, versus 4–5 years on a high tunnel. The rope-caterpillar system creates more friction points, so lifespan is slightly shorter. Replace when you see any yellowing or brittleness — a mid-winter blowout is much more expensive than a proactive re-cover.
Can I heat a caterpillar tunnel?+
Technically yes with a small propane heater, but the economics rarely work — you'd double the operating cost to push production of crops that are already profitable at ambient. Save heat for a dedicated propagation greenhouse and use caterpillar tunnels for cold-hardy production.
How does it compare to a high tunnel for winter production?+
Winter productivity per square foot is nearly identical for cold-hardy greens. The high tunnel wins for tender crops (winter tomatoes, cucumbers), permanent infrastructure and snow-load capacity. The caterpillar tunnel wins on capital cost (roughly 1/5), portability, and permitting simplicity — which is why most market gardens should build one before their first high tunnel.
Keywords
- caterpillar tunnel season extension
- caterpillar tunnel build
- winter greens market farm
- low tunnel vs high tunnel
- season extension ROI
Related reading

Farm Business
The Farm Business Plan: What the First Five Years Actually Cost
An honest, working-farm walk-through of the financials most new farm business plans get wrong — startup costs, cash-flow gaps, breakeven timing and the numbers lenders actually want to see.
July 11, 2026 · 11 min read
Market Gardening
Market Gardening: The First-Year Mistakes That Cost the Most
The pattern of expensive mistakes new market gardeners make in year one — and the small planning decisions that separate a viable second season from a shut-down.
July 1, 2026 · 8 min read
AgTech & Precision Farming
Smart Irrigation for Small Farms: Systems That Pay Back
Drip, sensors, and scheduling that actually work on 1–20 acres. Real system designs, costs, and the metrics that decide whether the investment pays for itself.
June 18, 2026 · 9 min read