Homesteading
Growing Oyster Mushrooms on a Small Farm: Substrate, Spawn and Fruiting
A practical guide to growing oyster mushrooms on pasteurized straw: choosing strains, preparing substrate, inoculating and incubating bags, managing the fruiting room, harvesting and selling a perishable crop.

Published October 18, 2026 · 8 min read
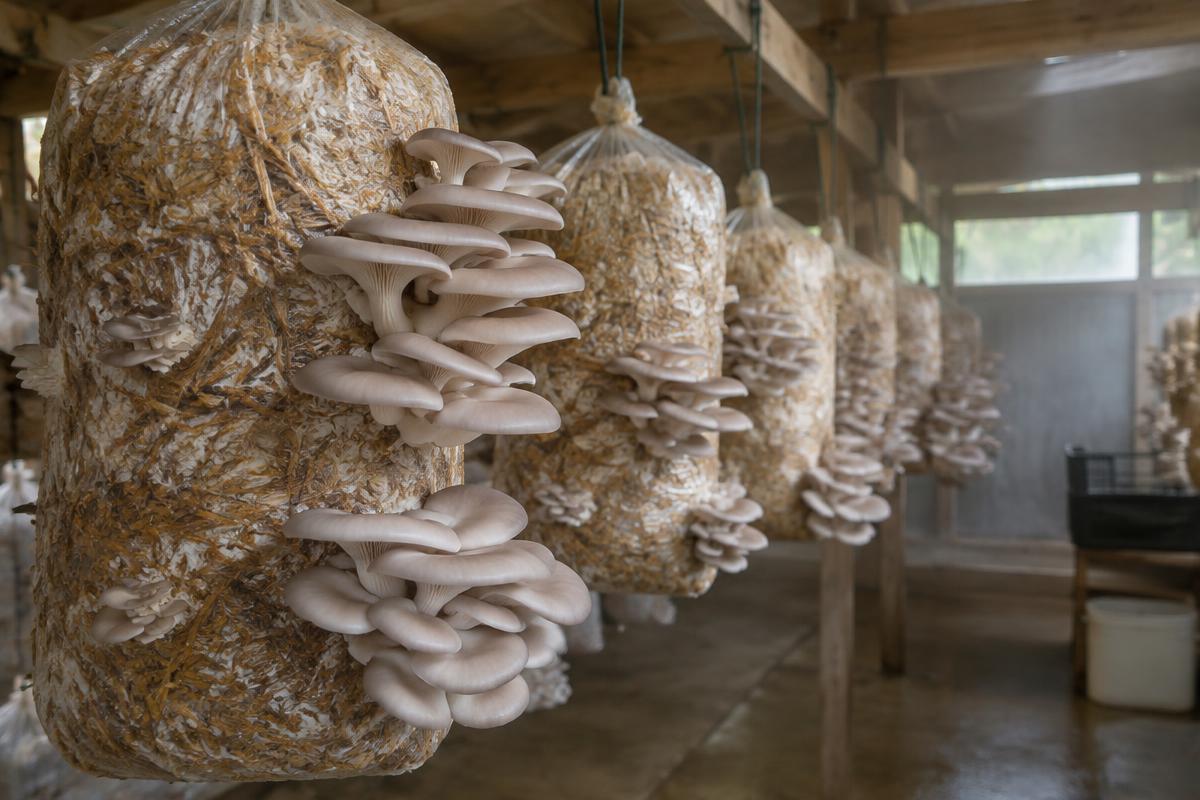
Oyster mushrooms are among the few crops that a small farm can produce all year, in a converted shed or spare room, from agricultural by-products that are often cheap or free. They grow quickly, sell well to restaurants and market customers, and turn wheat straw, rice straw or corn stalks into food in a matter of weeks. They are also unforgiving of carelessness: a crop depends on cleanliness, humidity and fresh air far more than on soil or sunlight. This guide covers the full cycle, from choosing spawn to selling a crop that must reach the customer within days.
Why Oyster Mushrooms Suit Small Farms
Most farm enterprises demand land. Oyster mushrooms demand space measured in square meters and grow vertically, with bags hung or stacked from floor to ceiling. A room of twenty square meters can hold enough bags to supply a weekly market stall and a few restaurant accounts. Production is continuous rather than seasonal, which smooths cash flow in the months when field crops earn nothing.
Oysters are also the most forgiving gourmet mushroom for beginners. They colonize substrate aggressively, tolerate a range of temperatures depending on strain, and grow on simple pasteurized straw rather than the sterilized supplemented sawdust that species such as shiitake and lion's mane typically require. And they close a loop on the farm: spent substrate, once the bags stop producing, makes a good addition to compost or a mulch for perennial beds.
How a Mushroom Crop Works
The mushroom you harvest is only the fruiting body of a much larger organism. The working part is the mycelium, a network of fine white threads that digests the straw by releasing enzymes. Growing mushrooms means giving that mycelium a clean, moist food source with little competition, letting it colonize fully in darkness, and then changing its environment to trigger fruiting.
The process has three stages. During inoculation, spawn, which is grain already colonized by mycelium, is mixed with prepared substrate. During incubation, the bags sit in warm darkness while the mycelium spreads through the straw until the bag turns solid white. During fruiting, the grower introduces fresh air, light and high humidity, and the mycelium responds by producing mushrooms. Each stage has different needs, and most failures come from treating them the same.
Choosing Strains and Spawn
Oyster mushrooms come in several species and many strains, and the choice should follow your climate and the temperature you can maintain. Blue and grey oysters, strains of Pleurotus ostreatus, prefer cooler fruiting conditions and produce dense, meaty caps with good shelf life. Pink oysters, Pleurotus djamor, thrive in heat, grow very fast and suit warm climates, though they are fragile and short-lived after harvest. The phoenix or summer oyster, Pleurotus pulmonarius, tolerates warmer rooms than blue strains and is popular in hot regions.
For a first season, buy grain spawn from a reputable supplier rather than producing your own. Making spawn requires sterile laboratory technique, and contaminated spawn ruins every bag it touches. Inspect spawn on arrival: it should be evenly white with a fresh, mushroomy smell. Green, black or slimy patches and sour odors indicate contamination. Store spawn cool and use it within a few weeks.
Preparing Straw Substrate
Straw is the standard oyster substrate because it is widely available, holds water well and is easily colonized. Chop it into short pieces of roughly five to ten centimeters so bags pack evenly and mycelium bridges gaps quickly. Use clean, dry straw that has not started to mold in storage.
Raw straw carries molds and bacteria that would outcompete the mushroom mycelium, so it must be pasteurized. Pasteurization does not sterilize; it reduces competitors while leaving some beneficial organisms that help protect the substrate. The most common small-farm method is hot-water pasteurization: submerge the chopped straw in water held at roughly 65 to 80 degrees Celsius for about one to two hours, then drain and cool it.
Two low-energy alternatives are widely used. Hydrated lime pasteurization soaks straw for twelve to eighteen hours in water made highly alkaline with agricultural hydrated lime, which suppresses most competitors without heating. Cold fermentation soaks straw in plain water for about a week, allowing anaerobic microbes to consume the sugars that molds would otherwise exploit, though it produces a strong smell. Whichever method you choose, drain the straw until it is moist but not dripping: a handful squeezed firmly should release only a few drops. Waterlogged substrate suffocates mycelium and invites bacterial rot.
Inoculation and Incubation
Inoculate once the straw has cooled below about 30 degrees Celsius, because heat kills spawn. Work in the cleanest space available, wipe surfaces and hands with alcohol, and avoid inoculating in the same room where old bags are fruiting, since mature mushrooms release clouds of spores and the room harbors contaminants.
Mix spawn through the straw at roughly five to ten percent of the wet substrate weight; higher rates colonize faster and resist contamination better, at a higher spawn cost. Pack the mixture firmly into clear polyethylene bags, tie them closed, and punch small holes evenly around the bag to allow gas exchange.
Incubate bags in a dark or dim room, ideally around 20 to 25 degrees Celsius for most strains. Space bags so they do not overheat, because colonizing mycelium generates its own warmth and the center of a tightly packed stack can rise well above room temperature. Depending on strain, spawn rate and temperature, full colonization typically takes two to four weeks. The bag is ready when it is uniformly white and firm. Remove any bag showing green, black or orange patches immediately, sealed, and well away from the growing area.
Running the Fruiting Room
Fruiting conditions are where commercial growers succeed or fail. Oysters need three things: very high humidity, plenty of fresh air and some light. Relative humidity of around 85 to 95 percent keeps young mushrooms from drying and cracking. A humidifier, a fogger, or regular misting of the walls and floor, rather than the mushrooms themselves, maintains it.
Fresh air is just as important and is often neglected. Mushrooms breathe out carbon dioxide, and when it builds up, oysters respond by growing long stems with small caps in an attempt to reach fresher air. A healthy crop has short stems and broad caps; leggy, trumpet-shaped clusters are a clear sign the room needs more ventilation. A small fan on a timer that exchanges the room's air several times an hour is a typical starting point, adjusted by watching the mushrooms.
Light does not feed the mushrooms but signals direction and triggers normal development. Indirect daylight or a few hours of ordinary lighting each day is sufficient. To start fruiting, cut slits or open the holes in fully colonized bags, move them into the fruiting room, and drop the temperature slightly for cool-weather strains. Small pins appear within a week or so and grow into harvestable clusters within a further five to seven days.
Harvest, Storage and Sales
Harvest when the caps have spread but before their edges turn upward and begin flattening or curling. At this stage the mushrooms have the best texture, shelf life and weight. Waiting too long produces brittle caps and heavy spore release, which can irritate the lungs of anyone working in the room; growers who spend long hours with mature oysters often wear a dust mask. Twist or cut the whole cluster at its base.
A bag usually gives its largest flush first, followed by one or two smaller flushes over the next several weeks. Yields depend heavily on substrate quality, strain and conditions, so record the weight harvested from every batch: those records quickly show which strain, spawn rate and pasteurization method performs best on your farm.
Oysters are perishable. Cool them promptly to a few degrees above freezing, pack them in paper bags or ventilated containers rather than sealed plastic, which traps moisture and causes sliminess, and sell within a few days. Restaurants value consistent weekly supply over occasional large volumes, so a standing order agreed in advance is often the most reliable outlet. At markets, a mixed display of colors draws attention, and offering cooking suggestions helps customers unfamiliar with gourmet mushrooms. Before selling, check local food-safety and licensing requirements for fresh produce.
Common Problems
Green mold, usually Trichoderma, signals poor pasteurization, contaminated spawn or a dirty working area. Discard affected bags and review your process rather than trying to rescue them. Slow colonization often comes from low temperature, low spawn rate or overly wet substrate. Long stems and small caps point to too much carbon dioxide. Dry, cracked caps point to low humidity. Small flies attracted to the substrate can be reduced with screened air intakes, sticky traps and strict removal of old bags.
Most problems trace back to hygiene and airflow. Keep incubation and fruiting separate, remove spent bags promptly, clean the room between batches, and keep simple records of each batch. Oyster mushrooms reward a grower who builds steady routines, and within a few cycles they can become one of the most dependable enterprises on a small farm.
Key takeaways
- ◆Oyster mushrooms produce year-round in a small indoor space and turn cheap straw into a high-value crop.
- ◆Match the strain to your climate: blue oysters for cool rooms, pink and phoenix oysters for warm ones.
- ◆Pasteurize straw and keep it moist but not dripping; contamination and waterlogging cause most failures.
- ◆Incubate in warm darkness until bags are fully white, then fruit with high humidity, fresh air and light.
- ◆Long stems mean too little fresh air; harvest before cap edges flatten and sell within a few days.
Frequently asked questions
How long does it take to grow oyster mushrooms?+
Typically two to four weeks of incubation for the straw to colonize, followed by about one to two weeks until the first harvest, depending on strain and temperature.
Do oyster mushrooms need sterilized substrate?+
No. Straw only needs pasteurization, which reduces competing organisms. Hot water, hydrated lime soaking and cold fermentation are all common small-farm methods.
Why are my oyster mushrooms growing long stems?+
Long stems and small caps are a sign of high carbon dioxide. Increase fresh air exchange in the fruiting room.
What can I do with spent mushroom substrate?+
Once bags stop producing, the spent straw can be composted or used as mulch around perennial crops, returning organic matter to the soil.
Keywords
- growing oyster mushrooms
- oyster mushroom straw substrate
- mushroom spawn
- pasteurizing straw
- mushroom fruiting room
- selling mushrooms at market
Related reading

Farm Business
Farm Record Keeping: The Paperwork That Actually Pays
The four records every small farm needs, how to track labor without losing your mind, paper versus spreadsheets, and how to turn a season of notes into next year's profit.
September 4, 2026 · 8 min read
Market Gardening
CSA Farming: How to Structure a Profitable Vegetable Subscription
Learn how to build a profitable CSA vegetable subscription with expert tips on pricing, crop planning, logistics, and customer retention strategies.
July 19, 2026 · 7 min read
Soil Health
Composting on a Working Farm: Systems That Actually Scale
Backyard piles do not translate to farm scale. A working agronomist's guide to windrow composting, C:N ratios, temperature management, and turning finished compost into a real soil-health tool.
July 12, 2026 · 12 min read